Cherry Plum Jam/Jelly?

I am definitely a city girl. Hanging out with my girlfriend Carolyn reminds me of this fact quite often. She grew up on farm property surrounded by animals. She participated in chores related to the farm and spent the majority of her childhood outdoors. I noticed when helping her unpack during her move last Summer,  that she had a lot of canning supplies. It was then that I learned that she enjoyed canning and she promised that she would teach me how to make jam. I jumped at the chance when she recently invited me over to attack the neighbor’s Cherry Plum tree hanging over her backyard fence.

Cherry Plum Tree

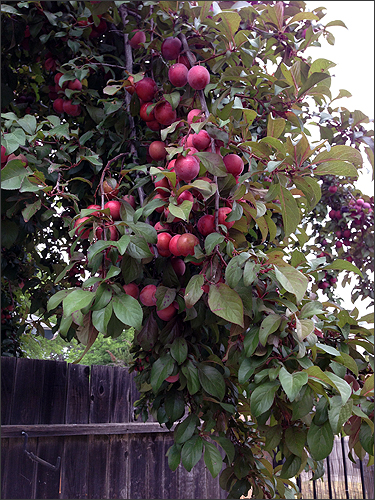
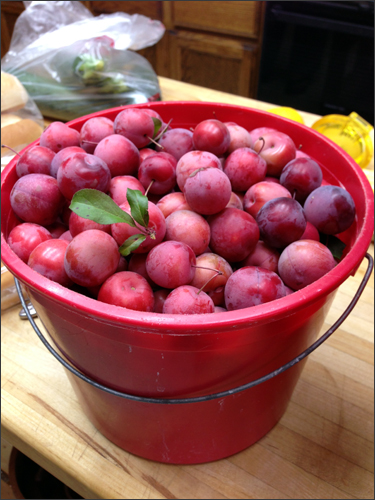
With buckets in hand, we went to work on the tree.

IMG_4359

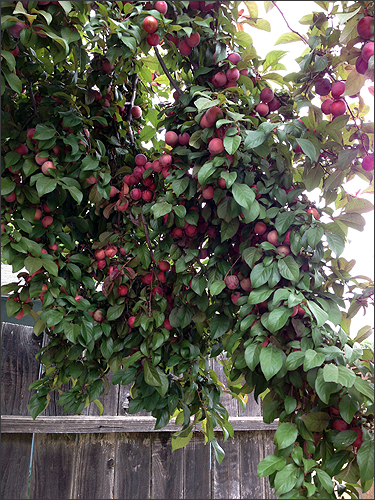
We grabbed mostly for the darker pieces of fruit, but after a while we just started grabbing handfuls of whatever. Besides our goal of making jam, we needed to clear the branches because the cherry plums were falling on the ground, staining it, and causing problems with the vehicles parked near.

IMG_4357

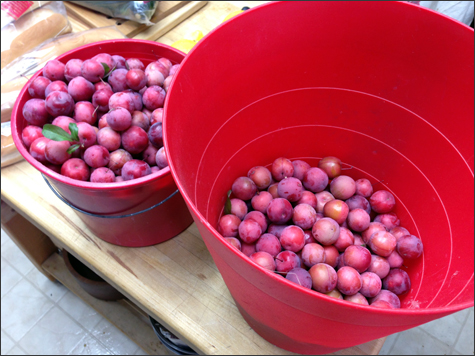
We collected two buckets of cherry plums. I was super “Miss Perfectionist” (shocking, I know) when it came to making sure all leaves and stems were removed… probably why Carolyn picked 3x’s as many in the same amount of time – there is also that whole “city” vs. “farm” girl thing. She takes care of  the stemming when needed during the washing process.

IMG_4356

I sampled several cherry plums – picking different shades to see if they tasted differently. I had never tried a cherry plum before and turns out, they are delicious. I didn’t notice that much of a difference in sweetness between the colors. The darker was softer, probably meaning they were more ripe, but that didn’t change the taste.

IMG_4360

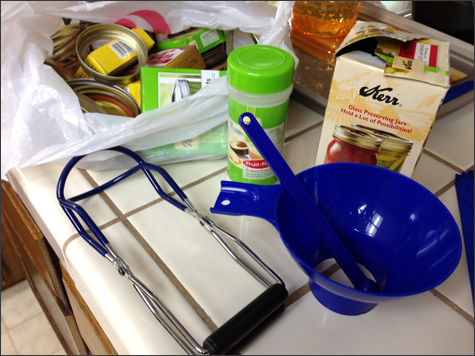
Carolyn dug out her canning supplies and I got to work rinsing the fruit and jars as she prepped the lids.

IMG_4361

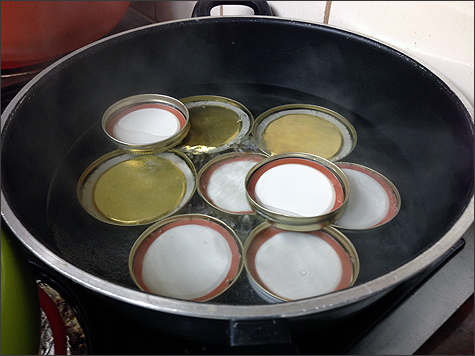
Lots of pots, lots of steam and heat filling the kitchen from the boiling water…

IMG_4365

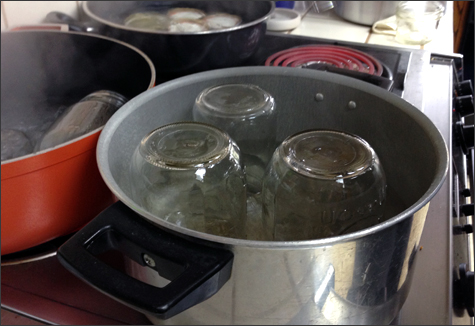
The jars went into the pots of boiling water… it took a while to get them upright in the orange pot because the base of the pot was slightly curved. I made the mental note – flat bottom pots are the key to jars staying upright.

We had a few different recipes pulled up on the iPad. Our major inspiration and the one we followed pretty closely was from Kitchen Travels, a blog I frequent regularly.

IMG_4368

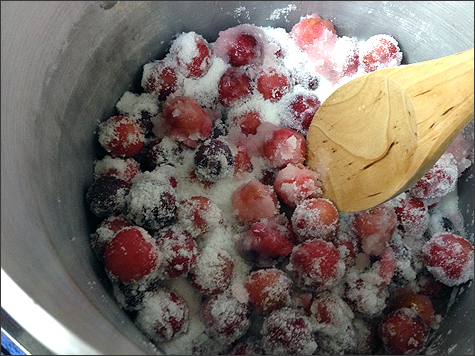
The sugar, lemon juice and water ingredients were added to the cherry plums and then we turned up the heat.

IMG_4369

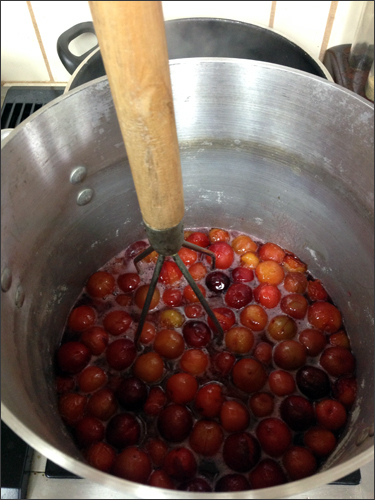
The size of the potato masher is not an illusion… it was HUGE, like broom handle huge, and it worked perfectly!

Ingredients:

  • 10 Cups Whole Cherry Plums
  • 6 Cups Sugar
  • 1/4 Cup Freshly Squeezed Lemon Juice
  • 1/4 Cup Water

Directions:

  1. Prepare boiling water in a pot that is tall enough to ensure you have at least 2″ of water covering the top of your jars, plus space to allow for a hard boil.
  2. Combine all ingredients in a large pot over medium-high heat, stirring and mashing the mixture until the sugar dissolves. (We used a giant potato masher)
  3. Turn off heat. Place a sieve over a large bowl. Carefully pour the hot mixture through the sieve, pressing on the solids. Set pot aside. Remove pits, reserving any fruit and skins left in the sieve. Add reserved fruit mash to strained mixture. NOTE: You can also run the mixture through a food mill if you have one.
  4. Return the fruit mixture to the pot. Bring slowly to a boil, then cook rapidly to gelling point. Stir frequently as the jam thickens to prevent sticking or burning. NOTE: We chilled a small plate in the freezer to test the set point. Using a teaspoon, let a few drops of the jam/jelly mixture drip on to the chilled plate and allow it to cool for a short while. Push your finger sideways against the jam/jelly. When it is at the right setting point, the jam/jelly should be sticky and a gel consistency.
  5. Once you get the right consistency, remove from heat. Ladle hot jam/jelly into clean, hot jars and seal. NOTE: For Ball or Kerr style jars, leave 1/4 inch head space. Wipe rims to dry and top with hot lids. Screw bands onto the jars just until finger tight. Carolyn’s method included turning the jars upside down. She shared that “flipping the jars over” to seal them, works really well. NOTE: Most canning websites and books recommend you use a full hot-water bath for canning jam, not the flipped jar method. Whatever, Carolyn’s method worked great!

IMG_4373

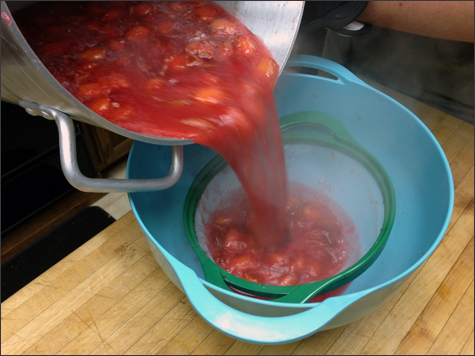
It was during the “Place a sieve over a large bowl. Carefully pour the hot mixture through the sieve, pressing on the solids.” step where our cherry plum jam became cherry plum jelly. The green plastic ring of the sieve ripped away from the mesh when we used a spoon to mash the cherry plums. Total bummer… we had decided not to pit them before hand, because on several of the sites, they mentioned the sieve or food mill way and we thought we’d be good to go. We opted to just go with the smooth texture… so jelly it was! The whole process is about timing everything and we certainly didn’t have time to run to the store to buy a new sieve and the mixture was way too hot to sort out the pits by hand.

IMG_4363

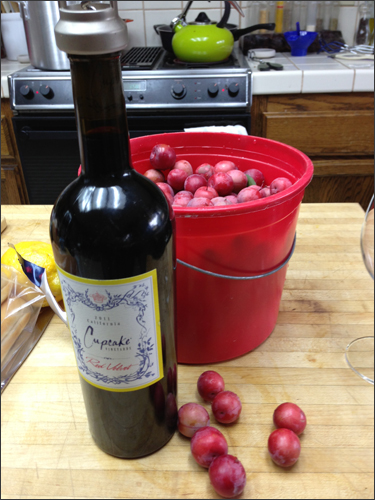
This is where the wine drinking came into play. It should probably be part of the ingredient list 🙂  – you know, to keep your sanity while juggling all the boiling pots, sticky surfaces, jars, spoons and plates.

IMG_4377

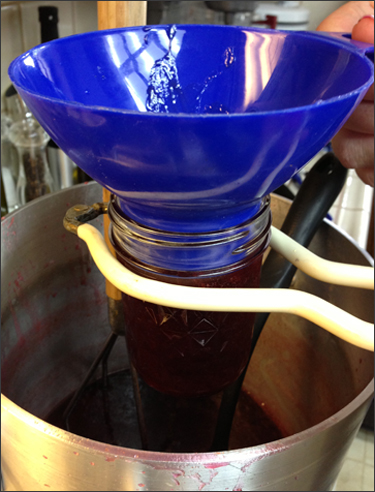
Once we got the mixture to the right gel consistency (after the plate test) – we ladled the jelly mixture into the hot jars using the canning jar lifting tongs and funnel.

IMG_4380

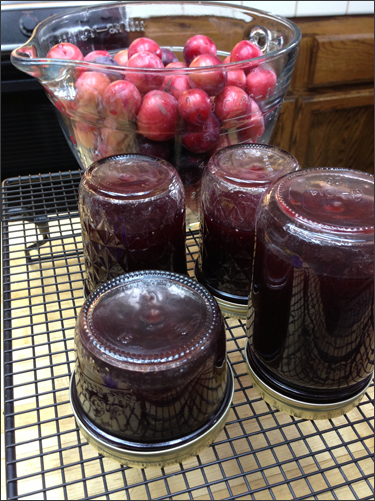
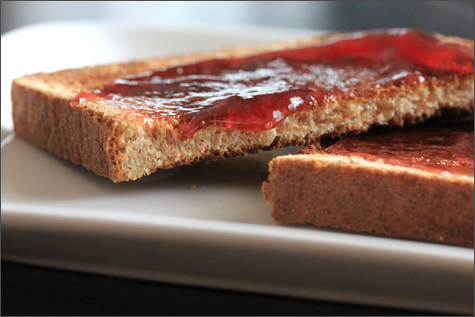
We put Carolyn’s upside down trick into action and then they sat overnight. Our fingers were crossed that the lids would pop and they did. Carolyn assured me that it’s not a big deal if one doesn’t seal, you just need to refrigerate and eat it as soon as possible. Our brains were already thinking… on toast, over ice cream, etc.

IMG_2068

Turns out that we probably heated it for two long before getting to the gel consistency… the jelly was pretty thick and a little hard to spread once chilled, but the taste was still there. The perfect amount of tartness, I don’t like super sweet jelly or jam.

Now I just need to learn how to make pepper jelly with my friends Tom and Paul. They got me hooked on their pepper jelly and eating it on eggs. Love the combo – oh so delicious!

Thanks Carolyn for letting me play in your kitchen and for teaching me about canning. It was a fun afternoon for sure. Now hurry up and start posting to your blog so I can link to you.

Question: What’s your favorite jelly/jam or preserve? I’m a strawberry preserves gal, with apricot preserves running a close second. We are a multiple jelly/jam/preserve jar family. Dan’s favorite is red raspberry preserves.

After answering that question, I realized… hmmm, I don’t really know the difference between the varieties. So to the Internet I went. Source: The Nibble

Jelly is a clear, bright product. It is generally made by cooking fruit juice and sugar with pectin as a gelling agent and lemon juice as an acid to maintain a consistent texture. Jelly is firm and will hold its shape Generally, jelly contains no pieces of fruit, although specialty jellies, like pepper jelly, may include pieces of pepper.

Jam is made from crushed or chopped fruit cooked with sugar, and often pectin and lemon juice. Jam can be a puree of fruit or have a soft pulp, but it does not contain chunks of fruit.

Preserves are fruit cooked with sugar to the point where large chunks of fruit or whole fruit, such as berries, are suspended in a syrup base. The texture of preserves is not smooth like jelly or jam.

Marmalade is a soft jelly, often citrus-based, that includes both the flesh and peel of the fruit suspended throughout the jelly base. The bitterness of the peel offsets the sweetness of the jelly.

Well that didn’t really clear up anything… not sure if we ended up with jam or jelly, ha! ha! It was made from crushed fruit, cooked with sugar, no on the pectin, yes on the lemon juice… it was a puree of fruit… no chunks…. so that’s jam… but it also fits the jelly description. I’m still confused.

foo1120

Permanent link to this article: http://foodiddy.com/?p=8882

All the marbles… and memories…

marbles-foodiddy3

I’ve been fascinated with marbles for a long time. My Dad had a big bag of marbles that he played with in the 1940’s – some were very beat up from hours and hours of play, others were in perfect condition. I remember sitting on the floor of my childhood family room using one of the big steelie marbles to crash into a pile. I never really took the time to learn how to play marbles correctly, I just loved looking at the colors and designs.

marbles-foodiddy1

My late husband Ace had a pretty big collection as well. I knew there was a bag stashed in a box in the office closet of our apartment, but I never really gave it a second thought until after he died. I decided our apartment needed more color after his death and I wanted to smile at all the color when I walked through the door. While my insides were dark and dreary, I wanted to surround myself with bright, pretty things.

I ended up purchasing a square glass dish from Pier 1 Imports and filling it with the marbles and placing it on the back of the bookcase behind the sofa. It was right by the front door and it did indeed make me smile when I walked through the door. Not only was it a reminder of him, the colors mirrored the super colorful artwork I had filled the apartment with.

One late night, about 1.5 months after his death… I was walking by the office and a distinct electrical burning smell was coming from the office computer. I freaked out… this was so “out of my comfort zone” – I immediately called our friend Stew. I remember crying on the phone because it was just another reminder of all the things Ace took care of during our marriage.

marbles-foodiddy4

Stewart came rushing over and it turned out  it was the computer’s mother board – it was fried. I just felt so defeated… really? what else could go wrong? I had no money, the computer was my lifeline to the online widow support forums and other grieving friends… It was too much.

Then, Stewart randomly grabbed the dish of marbles and we sat on the apartment floor and played. He set up the circle drawing a pattern in the carpet and through tears, we reminisced about Ace, I learned how to play marbles, we hit marble after marble with our shooters and next thing you know it was 3:30 a.m. and my tears had turned into gratitude… gratitude for being surrounded by dear friends that would come running over to help and comfort me during a very difficult time in my life.

So… this brings me to why I wanted to create something to showcase marbles that belonged to Ace, marbles that I had collected over the years since Ace’s death and marbles that my Dad played with as a child.

I had been waiting in line at the grocery store and I picked up a copy of Better Homes and Garden’s Special Edition – 100 Ideas, Flea Market Style – decorating with yard sale finds. I flipped through it and happened upon a photo of a gumball machine filled with marbles… that was it! Operation, I must purchase an old gumball machine was underway.

marbles-foodiddy2

Aaron and I looked at the antique fair, I searched Craig’s list and several different garage sales and thrift stores. I was casually searching and then decided to look at eBay, even though I really didn’t want to pay for the shipping. They were all over $100. We had a gumball machine growing up and my parents still have it on display in their game room… so I thought I might be able to convince them that I needed it. Turns out, my Mom and Dad are very attached to their gumball machine, LOL.

Aaron and I found several on our last trip to the Sacramento second Saturday antiques under the freeway event we’ve been frequenting the past year. They were all over a $100 and super vintage with advertising on the glass. I was more interested in a round, clean look… the rectangular shaped ones were cool, but I hadn’t found the right one.

A week later,  I got a text from Aaron’s girlfriend Carolyn telling me that she found a cool gumball machine at the Folsom Antique Fair… I was super excited, until I realized she had found it for herself :). She had walked through her front door to show Aaron and he said, “Cool, you found Kath a gumball machine!” – her answer, Kath? Um… didn’t know she was looking for one. Laughter ensued and then she said… Yep, apparently I found Kath a gumball machine. Keeping in mind, Carolyn is truly one of the sweetest people I’ve ever met… I was not going to be taking her “find” – she had even talked the person selling it down to $35 with the stand! SCORE!

Shortly after that, Aaron and Carolyn were slated to have dinner with us. They showed up with the gumball machine to surprise me. Best. Surprise. Ever!

Within 15 minutes, we had it taken apart and filled with my marble collection.

gumred2

I loved it! But… I wasn’t so sure about the bright red color… I left it in place for a few months. I wanted the marbles to be the “star” and I felt like the red took away from their individual uniqueness. Then I decided that I wanted to paint it. I watched a video on You Tube to get started – How to disassemble your gumball machine. Once I learned how easy it was, I got some paint.

IMG_2018

Carolyn and I went to Joanne’s and decided on DecoArt Metallic Glaze in Renaissance Brown. I used a 40% coupon and spent a whopping $3.50 on the glaze. I already had the flat black spray paint with the built in primer from another project.

IMG_4339

Thank you Amazon for the boxes I used to raise my gumball machine parts for painting. This is where I stopped taking photos, guess I really got into the painting.

2 hours and 2 coats later…

IMG_4346

The bronzing began… I used an art brush and a microfiber cloth to wipe off the excess.

IMG_4347

IMG_2008

I was so happy with the results! The bronze glaze is very subtle and really cool in person. My Mom and Dad sent me home with a bag of my Dad’s marbles on Father’s Day, so the gumball machine is a little fuller in some of the more recent photos, like the one below.

IMG_2013

IMG_2014

IMG_4349

IMG_4350

Foodiddy Gumball Machine

IMG_2057

IMG_2055

My customized gumball machine and special marble collection are displayed proudly in my entryway – not in my backyard by the pool, ha! ha!. Like in the apartment, I smile every time I walk through the front door. Total cost if you include the original price Carolyn paid – under $45 dollars. I had intended to pay her for the machine, but she generously gifted it to me for my birthday. Another reason to smile as I walk by.

I know this isn’t a food post or a recipe, but I do miss being able to write about life and things that are special to me. I guess technically… gumballs are food, but yes, marbles are stretching it. 🙂

I hope you guys don’t mind a few posts here and there talking about life, crafting, home decor and various DIY projects because I enjoy writing them and don’t feel like creating two blogs. I have problems finding the time for one blog, so Foodiddy it is.

foo1121


Permanent link to this article: http://foodiddy.com/?p=8841

Triple D – The Funky Finds in Flavortown

I had the opportunity to meet Guy Fieri at his new Johnny Garlic’s restaurant on Arden Way in Sacramento, CA. Johnny Garlic’s hosted a book signing promoting his latest edition of “Diners, Drive-Ins and Dives: The Funky Finds in Flavortown.”

Now you either love Guy Fieri or you love to hate Guy Fieri… I personally enjoy his Diners, Drive-Ins and Dives show and have found myself in several of the restaurants he has profiled. I also love that my 11 year old niece is a big fan and it’s a show she and her family can enjoy together. I jumped at the chance when my friend Kristen extended an invite.

guysigning

Image Source

I think it’s cool that Guy is an alumni of our local American River College’s culinary arts program (according to Sacbee) and that he’s highlighted quite a few restaurants and dives in my area. I have watched Guy’s Big Bite a handful of times, and I watched him on Rachael vs. Guy: Celebrity Cook-Off and The Next Food Network Star. I’ve watched The Next Food Network Star every season since Guy won. My favorite on the show this year is Chad Rosenthal, the BBQ guy – and I’m so damn happy that Danushka went home last week – couldn’t stand her on Chopped and nothing changed with her being on The Next Food Network Star. I wish Viet Pham would come out of his shell, his food fascinates me. So yes, still addicted to most shows on The Food Network.

IMG_1978

We arrived at Johnny Garlic’s and got a great parking spot.

IMG_1970

We quickly purchased our books, got our numbered tickets and then grabbed a table to order.

IMG_4552

IMG_4543

The menu had everything from garlic fries to the Hunter’s Creation for the evening – several antelope specials.

IMG_4545

I ordered a starter as my main meal – The Sashimi Won Tacos – Mango/Jicama Salsa combined with Raw Ahi Tuna, they were delicious. It should be known that I’m a huge raw ahi fan, so there’s that to take into consideration. Kristen ordered the Black and Blue Burger – Blackening Spice, Stella Blue Cheese, Lettuce, Tomato, Onion and Donkey Sauce. We both made great choices and were happy with the service and our meal. In case you were wondering…

Donkey Sauce:

  • 1 cup prepared mayonnaise
  • 1/4 cup roasted garlic
  • 1 teaspoon regular yellow mustard
  • 4 dashes Worcestershire sauce
  • 1/4 teaspoon kosher salt
  • 4 pinches ground black pepper

Mix the mayonnaise, roasted garlic, mustard, Worcestershire, salt and pepper together until smooth.

IMG_1951

Guy came in through the back door to the kitchen and he made his rounds to some VIP’s awaiting his arrival.

IMG_1954

I snapped photos like a paparazzi and then we made our way to the book signing/meet and greet area.

IMG_1976

Ticket 53, that’s me…

Guy Fieri and Foodiddy

He was super cool and complimented me on my hair and then he said… “Foo!” – I love it!

Foodiddy and Guy Fieri

I told him “Foo” was a nickname and about my food blog and then he signed my book and one I had gotten for my brother and his family. I was a total foodie nerd and clearly excited in the above photo, LOL. Thanks Kristen for taking photos.

photo-5

My signed book… and  YES, red heads do ROCK!… even if the red is not real. Thinking he can relate to the whole “not real” hair color thing.  🙂

DSCN5722

He chatted with Kristen and signed her books right before it was my turn. I snapped a million photos, but the best one was taken from staff with her very own camera.

IMG_1984

One of the coolest things was Guy’s interaction with this little girl. She was a huge fan of his show. They fist bumped and he wrote and drew something special for her on the tiny brown apron she brought with her. I know there were stars involved… she was grinning from ear to ear, it was adorable!

Such a great event. It was fun talking to his “super fans” and I’m grateful that we had the opportunity to meet him. I will definitely be going back to the restaurant to try other items on the menu and I will continue to try some of the Diners, Drive-Ins and Dives highlighted in the book and on his show.

foo1121


Permanent link to this article: http://foodiddy.com/?p=8766