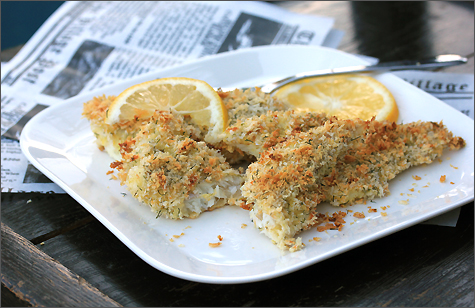
Crispy Baked Wild Alaska Cod

I once again decided to try cooking a new fish. Not only did the Alaska Seafood Marketing Institute (ASMI) send me halibut, they also sent me some Wild Alaska Cod filets.

I had never attempted to cook cod before. I busted out my Alaska Seafood Quick Reference Guide and learned more about the fish. Wild Alaska Cod is available fresh in fall and winter, but also available frozen year-round. Wild Alaska Cod has an average weight of 5 to 10 lbs. and is commonly sold as skinless, boneless fillets or portions. Due to its firm texture, it adapts well to most cooking methods. It is also low in fat and calories and an excellent source of high quality protein.

I defrosted the filets overnight in the fridge. I had been looking at different recipe options for several weeks. I turned down some magazine pages and bookmarked a few recipes on different websites, but settled on adapting one from my local grocery store’s member magazine. I substituted several of the ingredients and omitted the “chips” portion of the fish and chips.

Ingredients:

1 1/2 Cups Panko Bread Crumbs
3/4 Cup Finely Shredded Parmigiano-Reggiano
1 Teaspoon Freshly Ground Sea Salt
1 Teaspoon Freshly Ground Black Pepper
1 Teaspoon Dried Dill
3 Eggs
1 1/2 Tablespoons Spicy Brown Mustard
1/2 Cup Flour
1 1/4 Lbs. Cod Fillets – Cut into 3-4 inch long pieces
Olive Oil – to lightly coat baking sheet
Meyer Lemon Wedges

Directions:

  • Preheat oven to 425° F and lightly spray baking sheet with olive oil. Any spray would probably work. You could also line baking sheet with foil.
  • Stir together bread crumbs, cheese, salt, pepper and dill in a shallow dish.
  • Place flour in another shallow dish.
  • Beat together eggs and mustard in a third shallow dish.
  • Dip fish pieces into flour, then egg mixture, then bread crumb mixture; place on baking sheet.
  • Bake 15 minutes or until fish flakes easily with a fork. Serve immediately with lemon juice/wedges.

I got my panko bread crumb mixture ready to go…

My spicy brown mustard and eggs were next on the agenda. I whisked them together and then measured out my flour and portioned out my cod.

I was ready for fish dipping… let the party begin.

First into the flour and then into the egg/mustard mixture…

Taking a photo with flour/egg fingers and trying to use your leg to get Finn off the table bench was quite the feat. It sure proved that I’ve got mad skills when I’m on a blogging mission. I may or may not have also yelled for Dan to control the pup.

All panko’d and ready to roll/bake.

15 minutes and a little additional time under the broiler (about 2 minutes) left me with these glorious pieces of baked fish. I cut up a Meyer lemon from my friend Paul’s tree and squeezed some on top of the fish pieces and then sliced some for the garnish. I was running around the kitchen like a mad woman because I was losing my outdoor light. I brought my bench outside, grabbed some paper inserts to rest my plate on and I love the way this photo came out. Almost too dark, but I think just right for the occasion.

Dan and I have been on the go for what seems like months. It was nice to sit down to a home cooked meal and I yet again conquered another “new to me” fish.

Dan preferred his with just the drizzled lemon juice… I ended up dipping my last two pieces in some tartar sauce. I liked it both ways.

The Wild Alaska Cod had a distinctive large flake to it and a slight hint of sweetness. I was very happy with how moist the fish was and for it to be a hit with Dan was huge… he is not really a fish fan. So woohoo! – another fun recipe to add to my growing fish collection.

Thanks again to the Alaska Seafood Marketing Institute for helping me once again conquer cooking another type of fish. I’m getting so spoiled with fresh Alaska fish.

My kitchen is a DISASTER and now I could use a beer.

Time to kick it on the couch with a movie. We’ve had Sherlock Holmes – A Game of Shadows for over a month now. Yes Netflix, we suck…. but no worries, because I can make a damn good Crispy Baked Wild Alaska Cod.

Permanent link to this article: http://foodiddy.com/?p=8039

Nutty Asian Noodles w/Carrots & Edamame

I was cruising through old magazines and happened upon a “Noodling Around” article in the June 2012 issue of Every Day w/Rachel Ray. The article was geared towards cooking with kids. No kids here, but I love noodles. The ingredients looked fairly simple and I already had most on hand, so I decided to be a kid and give the family friendly (their words) recipe a try. “Perk up pasta night with a yummy, nutty sauce and plenty of colorful, kid-approved veggies” by Tracey Seaman.

Nutty Asian Noodles with Carrots and Edamame – don’t mind if I do. I did make a few substitutions and they are noted in my ingredients below.

Ingredients:

1 1/4 Cups Unsalted Cashews – could also use peanuts
2 1/2 Carrots – original recipe called for 2
2 Dorat Crushed Ginger Cube – original recipe called for 1 inch piece of fresh ginger
1 Cup Vegetable Broth
3 Tablespoons Tamari/Soy Sauce
2 Tablespoons Rice Vinegar
2 Teaspoons Toasted Sesame Oil
2 Tablespoons Dark Brown Sugar – packed
Salt to Taste
2/3 lb. Dried Linguine – could also use 1 lb. fresh lo mein noodles
1 Cup Thawed Frozen Shelled Edamame

Directions:

  • Preheat the oven to 350° F. Spread the cashews on a baking sheet. Roast until toasted – about 8 minutes. Let cool. Measure out 1/4 cup nuts, chop and set aside for garnish.
  • Peel the carrots and shred them with a grater.
  • If using fresh ginger, peel the ginger and set aside.
  • Bring large pot of water to a boil
  • Measure the vegetable broth in a large liquid measuring cup, then pour in tamari/soy sauce, rice vinegar and sesame oil; stir to combine.
  • Blend/Process the whole toasted cashews, brown sugar, ginger, and 1/4 teaspoon salt until finely chopped. I used my mega blender, but if using a food processor, just pulse until finely chopped. With the machine running, slowly pour in the broth mixture and process or blend until smooth.
  • Add the noodles to the boiling water and cook according to package directions.
  • Drain the noodles in a colander and rinse well with cold water. What? Rinse my pasta? Um… o.k.
  • Transfer the noodles to a large bowl and pour the sauce over the noodles and stir. Add the edamame and carrots and stir again.
  • Serve noodles in bowls and sprinkle reserved chopped nuts on top.

I ended up using 2 1/2 carrots because my carrots were pretty slender and I always like to add a little more veggies to my salads than recipes suggest.

It was cut the top off your photos day… didn’t you get the memo? I mixed up my liquids and then put my cashews, brown sugar, ginger and salt into my blender.

I used the “stir” function until I got a finely chopped texture. I then slowly added my liquid mixture and blended until smooth.

I then added the sauce to my cooked noodles, but not before rinsing. Wow, had a hard time doing that. I’ve always been told… DO NOT RINSE your pasta. I’m guessing it was because the salad was meant to be served cold. At first you might think that there is too much sauce, but trust me… you will need it. The sauce does really soak into the noodles with time.

I then added my edamame and shredded carrots and gave the noodles a good mixing with tongs.

I garnished with the chopped cashews that I had set aside. I then proceeded to take a million different photos with different bowls, chopsticks, table surfaces and placemats. I was starting to lose my light and it was a reminder that Fall is indeed here. Time to break out my umbrella lights or do most of my recipe cooking during the day on weekends. The 8 to 5 job gets in the way of my food photography, but kind of nice that it allows me to actually eat. 🙂

The noodles just got better and better with each day. I pretty much ate them for lunch and dinner for 2 days straight. It was a fun twist to a pasta dish and the nutty flavor kept me going back for more. Next time I will probably add even more veggies. Some steamed broccolini or bean sprouts might be good.

An easy dish and a good one to bring to a party… it really did hold up well. Just make sure you know your audience or make a sign that lets people know that the sauce contains nuts. Guests whipping out epi pens or going into anaphylactic shock would NOT be a good thing.

Permanent link to this article: http://foodiddy.com/?p=8011

Baked Pumpkin Spice Donuts

I finally jumped on the Pinterest bandwagon and I’ve been pinning up a storm. I was noticing a lot of my blog traffic was coming from Pinterest and search results over the past year have shown me that lots of Foodiddy photos and recipes have been pinned. So instead of fighting it for years like I did with Facebook,  I decided to just get an account. That is where I found the recipe for these wonderful baked pumpkin spice donuts.

My SIL got me a donut pan last Christmas and I’d only used it one other time. My obsession with Fall and all things pumpkin (ex: mainlining Starbucks Pumpkin Spice Lattes) led me down the baked donut path. I recently purchased the following pumpkin products, fueling my pumpkin obsession even more.

The English muffins were pretty good… a little doughy, I liked them super toasted with a little butter. The bagel thins were also good toasted – in the event that you have been pulling your bagel thins apart and toasting each 1/2 separately… Stop. Right. Now! I used to do that and they would turn out like sheets of poster board. Now I just toast them whole, it made a huge difference. I put a little cream cheese on each 1/2 and I was good to go. The Entenmann’s pumpkin donuts were also good, but the baked definitely gave them some competition. The glaze on the Entenmann’s was borderline too sweet. Is that even possible? Who am I?

The Limited Edition Pepperidge Farm Pumpkin Cheesecake cookies were great. I cracked open the bag and the spicy cake like smell that followed was pure heaven. They were soft and chewy with tasty bites of cheesecake. Probably a one time buy, but worth it.

The Planters Pumpkin Spice Almonds have been one of my favorite pumpkin finds this season. The perfect sweet snack. If you are looking for savory, you’ll need to add salt :).

O.k.. back to the baked pumpkin spice donuts. The recipe was pinned from the King Arthur Flour website. While I didn’t use King Arthur Flour, I did follow the recipe with only a few substitutions.

I had all of the ingredients except I was low on canned pumpkin and sugar. I’d been adding Libby’s pure pumpkin to smoothies and knew I didn’t have enough. I ran to the store and got a few more cans. Can’t wait until the cans are on sale pre-Thanksgiving.

Ingredients:

1/2 Cup Vegetable Oil

3 Large Eggs

1 1/2 Cups Granulated Sugar

1 1/2 Cups Pumpkin Purée (canned pumpkin)

1 1/2 Teaspoons Pumpkin Pie Spice (or 3/4 teaspoon ground cinnamon plus heaping 1/4 teaspoon each ground nutmeg and ground ginger) – I ended up using the pumpkin pie spice and fresh ground nutmeg and a pinch of ginger.

1 1/2 Teaspoons Salt

1 1/2 Teaspoons Baking Powder

1 3/4 Cups + 2 Tablespoons All Purpose Flour

Coating Ingredients

3 Tablespoons Cinnamon and Sugar Mixed Together
1 Teaspoon Pumpkin Pie Spice

Directions

  • Preheat the oven to 350°F. Lightly spray/grease donut pan. If you don’t have a donut pan, you can bake muffins instead using a standard muffin tin.
  • Beat together the oil, eggs, sugar, pumpkin, spices, salt, and baking powder until smooth.
  • Add the flour, stirring again until smooth.
  • Fill the wells of the donut pan about 3/4 full; use a scant 1/4 cup of batter in each well. If you’re making muffins, fill each well about 3/4 full; the recipe makes about 15, so you’ll need to bake in two batches (unless you have two muffin pans).
  • Bake the donuts for 15 to 18 minutes, or until a toothpick inserted into the center of one comes out clean. If you’re making muffins, they’ll need to bake for 23 to 25 minutes.
  • Remove the donuts from the oven, and after about 5 minutes, loosen their edges, and transfer them to a rack to cool.
  • While the donuts are still warm (but no longer fragile), gently shake them in a plastic or paper bag with the cinnamon-pumpkin spice-sugar. If you’ve made muffins, sprinkle their tops heavily with cinnamon-pumpkin spice-sugar.
  • Cool completely, and wrap airtight; store at room temperature for several days.

I measured out my pumpkin into my handy Alton Brown measuring contraption… love it!

I got all of my ingredients into the mixing bowl and mixed on low until smooth.

I measured out my flour and slowly added it to my pumpkin mixture.

I used my large cookie scoop (Yes, I’m a kitchen gadget freak) to place the donut batter into the wells.

I used a small rubber spatula to even out the batter in the wells.

I popped them in my 350° F. oven and checked them at 15 minutes. They were done, the toothpick came out clean. I then placed the donut pan onto my cooling rack for a good 5 minutes.

I poured my cinnamon-pumpkin spice-sugar mix into a plastic bag and gave each donut a good coating.

A plate of donut heaven… they were awesome straight out of the oven… and even hours later.

Cake like moist centers… love the bright orange color.

Enjoyed by all – even little Halloween critters. Yes, I busted out some of my Halloween decorations and the countdown begins to one of my favorite holidays to decorate for.

Now if only it would stop being 100 degrees out.

Dear Fall Weather,

I need you in my life.

Love,

Foo

Questions… Are you a doughnut, donut or doh-nut person? What’s your favorite type of donut? I have always been a donut person… pretty sure it’s because as a kid Winchell’s and Manley’s Donuts were my favorite places to go after church on Sundays. Had they been doughnut places… maybe I’d be typing/saying that. As for my favorite donut,  I’m a rainbow sprinkled cake donut girl with an occasional sugar or glazed. Dan is all about the jelly filled. Yuck.

Now I just need to try my hand at deep frying donuts.

Permanent link to this article: http://foodiddy.com/?p=7978